Running ROS Nodes Using the Docker Container
At this stage, you should have a Docker image named depth_anything_ros:latest, which will be used to create a container and execute the ROS node.
You can verify that the image was built successfully by running:
docker imagesIf the build was successful, the image depth_anything_ros:latest should appear in the list.
To verify that the setup is functioning correctly, the repository includes a sample ROS bag that can be used to generate real-time depth outputs.
Docker Mounting (Required for Default Setup)#
The official Dockerfile removes the launch and node_scripts directories from the image, expecting these to be mounted from the host machine at runtime.
Without mounting these folders, the ROS launch files—including test.launch—will not exist inside the container and cannot run.
Mounting allows you to edit launch files and Python scripts on your host machine while the container uses the updated versions without rebuilding the image.
Why the Default Repository Instructions Do Not Work Out of the Box#
The repository suggests two ways to launch the container.
Both approaches have issues that prevent them from functioning correctly without additional configuration.
1. Raw Docker Run Command (from README)#
docker run --rm --net=host -it --gpus 1 depth_anything_ros:latest /bin/bashThis command will fail because:
- The required
launch/andnode_scripts/directories are not mounted test.launchcannot be executed, since it depends on files removed by the Dockerfile
2. run_docker.py Script Provided in the Repository#
This script introduces two additional issues:
It launches RViz inside the container, causing:
- GUI opening errors
- LLVM out-of-memory crashes
- Rendering or driver issues
It sets a hardcoded ROS master hostname (
pr1040)
If this hostname does not exist on your system, ROS reports:
ERROR: unable to contact ROS master
caution
For users who are already familiar with Docker mounting, networking configuration, and GUI forwarding, the run_docker.py script can be modified fairly easily to work correctly.
However, these custom adjustments are not covered in this documentation, and users are encouraged to explore them independently if they wish to continue using the repository’s script.
Recommended Approach: Use the Custom Workflow#
Due to the issues described above, the Custom Workflow (in the next section) offers the most reliable option.
It provides:
- Pre-generated TensorRT engines
- RViz running on the host
- Correct mounting behavior
- Fewer networking problems
- Full GPU support
This is the workflow most users should follow.
If You Prefer to Use the Default Image#
If you still wish to proceed with the base image, the repository’s suggested command:
docker run --rm --net=host -it --gpus 1 depth_anything_ros:latest /bin/bashwill not work unless you manually address:
- Mounting of
launch/andnode_scripts/ - Preventing RViz from running inside the container (
use_rviz:=false) - Correct ROS networking (
-host 127.0.0.1when usingrun_docker.py)
A corrected Docker command would be:
docker run --rm --net=host -it --gpus 1 -v $(pwd)/launch:/root/catkin_ws/src/depth_anything_ros/launch -v $(pwd)/node_scripts:/root/catkin_ws/src/depth_anything_ros/node_scripts depth_anything_ros:latest /bin/bashOnce inside the container, run:
roscd depth_anything_ros./scripts/onnx2tensorrt trained_dataroslaunch depth_anything_ros test.launch use_rviz:=falsenote
Running RViz on the host machine is strongly recommended.
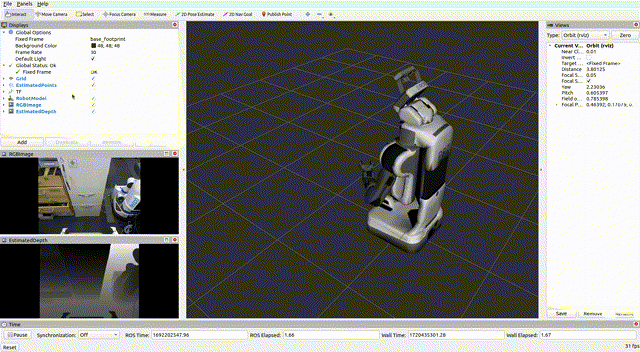
Expected Output#
If everything is set up correctly, you should see an output similar to the example below: