Vision Sensor: Setup & Installation
Vision Sensor Details#
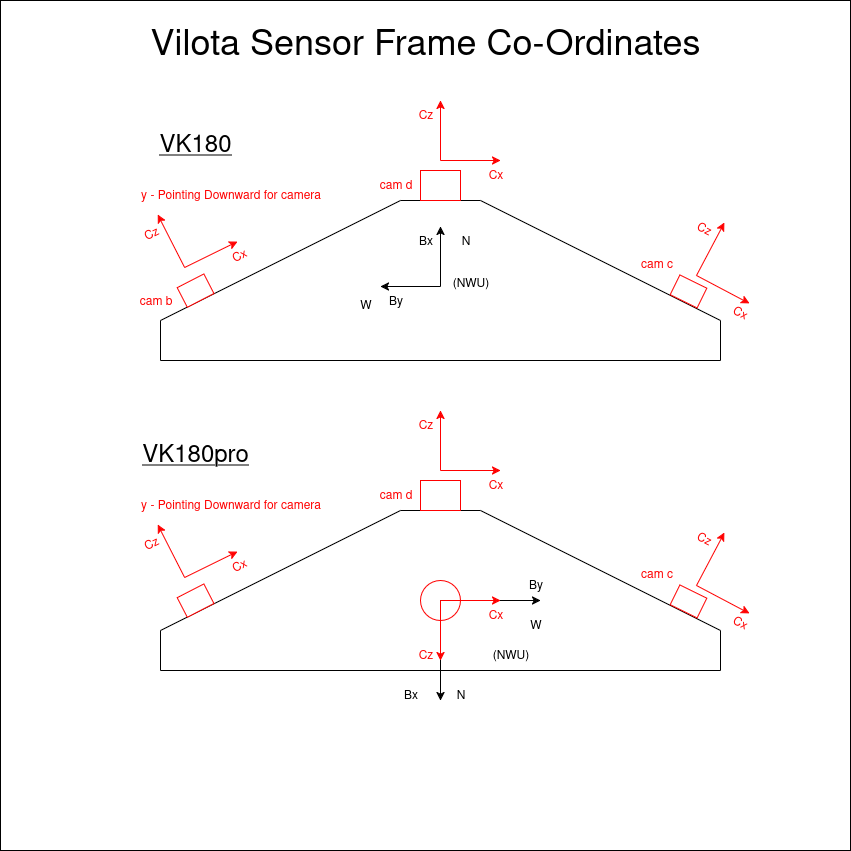
Front Vision Sensor : VK180Pro
Download the extrinsic files for VK180Pro
Rear Vision Sensor : VK180
Download the extrinsic files for VK180
Network Configuration for Vision Sensors#
On OBC, delete whatever ethernet network connections are available
nmcli connection showsudo nmcli connection delete <connection-name>Setup network connection for the vision modules:
sudo nmcli connection add type ethernet ifname enP1p1s0 con-name visionmodulesudo nmcli connection modify visionmodule ipv4.method shared ipv4.routes 239.0.0.0/24 ipv4.route-metric 1sudo nmcli connection up visionmodule

sudo systemctl restart NetworkManager
nmcli connection show #check the active network connection and ensure visionmodule is activeSetup & Installation#
To install required packages to integrate the vision sensors with the on-board computer, follow the steps below,
Enabling Time Sync Between OBC & Vision Sensors#
Download the Precision Time Protocol(PTP) package on the OBC
sudo apt install linuxptpDownload the ptp4_software_master.conf file
Run the following on the host computer (e.g., Jetson Orin) for starting time synchronizer and verify its working
sudo ptp4l -2 -i <dev> -S -m --step_threshold=1 -f ~/path/to/ptp4l_software_master.conf
#<dev> = Network interface name, if you have configured the network as provided above, then <dev> should be replaced with enP1p1s0
sudo ptp4l -2 -i enP1p1s0 -S -m --step_threshold=1 -f ~/path/to/ptp4l_software_master.confCreating Service for Time Sync#
To automate and start the ptp time synchronizer on boot for the vision sensors, follow the below steps
sudo vim /etc/systemd/system/vision_timesync.serviceCopy and paste the following into file and save the file
[Unit]Description= PTP4L based Time Sync Service for Vilota Vision ModulesAfter=network.target
[Service]Type=simpleExecStart=/usr/sbin/ptp4l -2 –i enP1p1s0 –S –m –step_threshold=1 –f /home/nvidia/Downloads/vilota/ptp4l_software_master.confRestart=on-failureUser=root
[Install]WantedBy=multi-user.targetYou could also download the vision_timesycn.service file and move it to /etc/systemd/system/
sudo mv /path/to/vision_timesync.service /etc/systemd/system/Reload the daemon and enable the vision_timesync.service
sudo systemctl daemon-reexecsudo systemctl daemon-reloadsudo systemctl enable vision_timesync.service
sudo systemctl start vision_timesync.servicesudo systemctl status vision_timesync.service #to check the status of the time synchronizer for the vision modulesTo restart the vision_timesync.service if needed
sudo systemctl restart vision_timesync.serviceUpdating Vision Sensors#
Connect the vision sensor to the host PC and open its WebUI on any browser: 10.42.0.64 #For VK180Pro Sensor(Master) 10.42.0.65 #For VK180 Sensor(Slave) and also SSH into the vision sensor using a terminal
#For Master vision sensorssh compulab@10.42.0.64
#For Slave vision sensorssh compulab@10.42.0.65On WebUI under Home section, check the DP Modules checkbox and click Update
After updating the vision sensor using WebUI, inside the sensor, modify the settings.yaml file as below,
$ sudo vim /var/lib/vilota/vk_manager/settings.yaml  #For VK180Pro (Master), network:     managed: true     identifier: 1
#For VK180 (Slave), network: managed: true identifier: 2 After modifying the settings.yaml file, do `sudo systemctl restart vk-manager-server.service'
Reboot the sensor
Modify the sensor configuration on the WebUI under Modules as below,
For VK180Pro (Master),
Time Synchronizer
Start-on-boot : Yes Role : BoundarySoftware Camera Driver 0
Start-on-boot : Yes Time-synchronized : Yes Start Configuration : vk180-pro_light_rectified.json VIO 0
Start-on-boot : Yes Start Configuration : vk180-pro_moderate_rectified.json For VK180 (Slave),
Time Synchronizer
Start-on-boot : Yes Role : SlaveSoftware Camera Driver 0
Start-on-boot : Yes Time-synchronized : Yes Start Configuration : vk180_light_rectified.json VIO 0
Start-on-boot : Yes Start Configuration : vk180_moderate_rectified.json